Lesson 39: Control of external devices
[1]:
import time

import serial
import serial.tools.list_ports

import panel as pn
pn.extension()
In this lesson, we introduce control of external devices using a serial connection. The important package for this purpose is PySerial, which you can install if you haven’t already using
conda install pyserial
It enables communication with devices over a serial port, often a USB port. When you import it, you import it by the name serial.
Arduino
Of course to do this tutorial, we should have an actual device with which to communicate. Therefore, I encourage you to actually build the device below and connect it to your computer and work through this lesson running a live Jupyter notebook.
For our device in this example, we will use an Arduino Uno board. These ≈$20 boards offer great functionality and are fun to just play with. Beyond, that, they are actually quite useful in research applications and have widespread use in research labs across disciplines, including in the biological sciences.
We will use our board with a simple circuit, shown below.
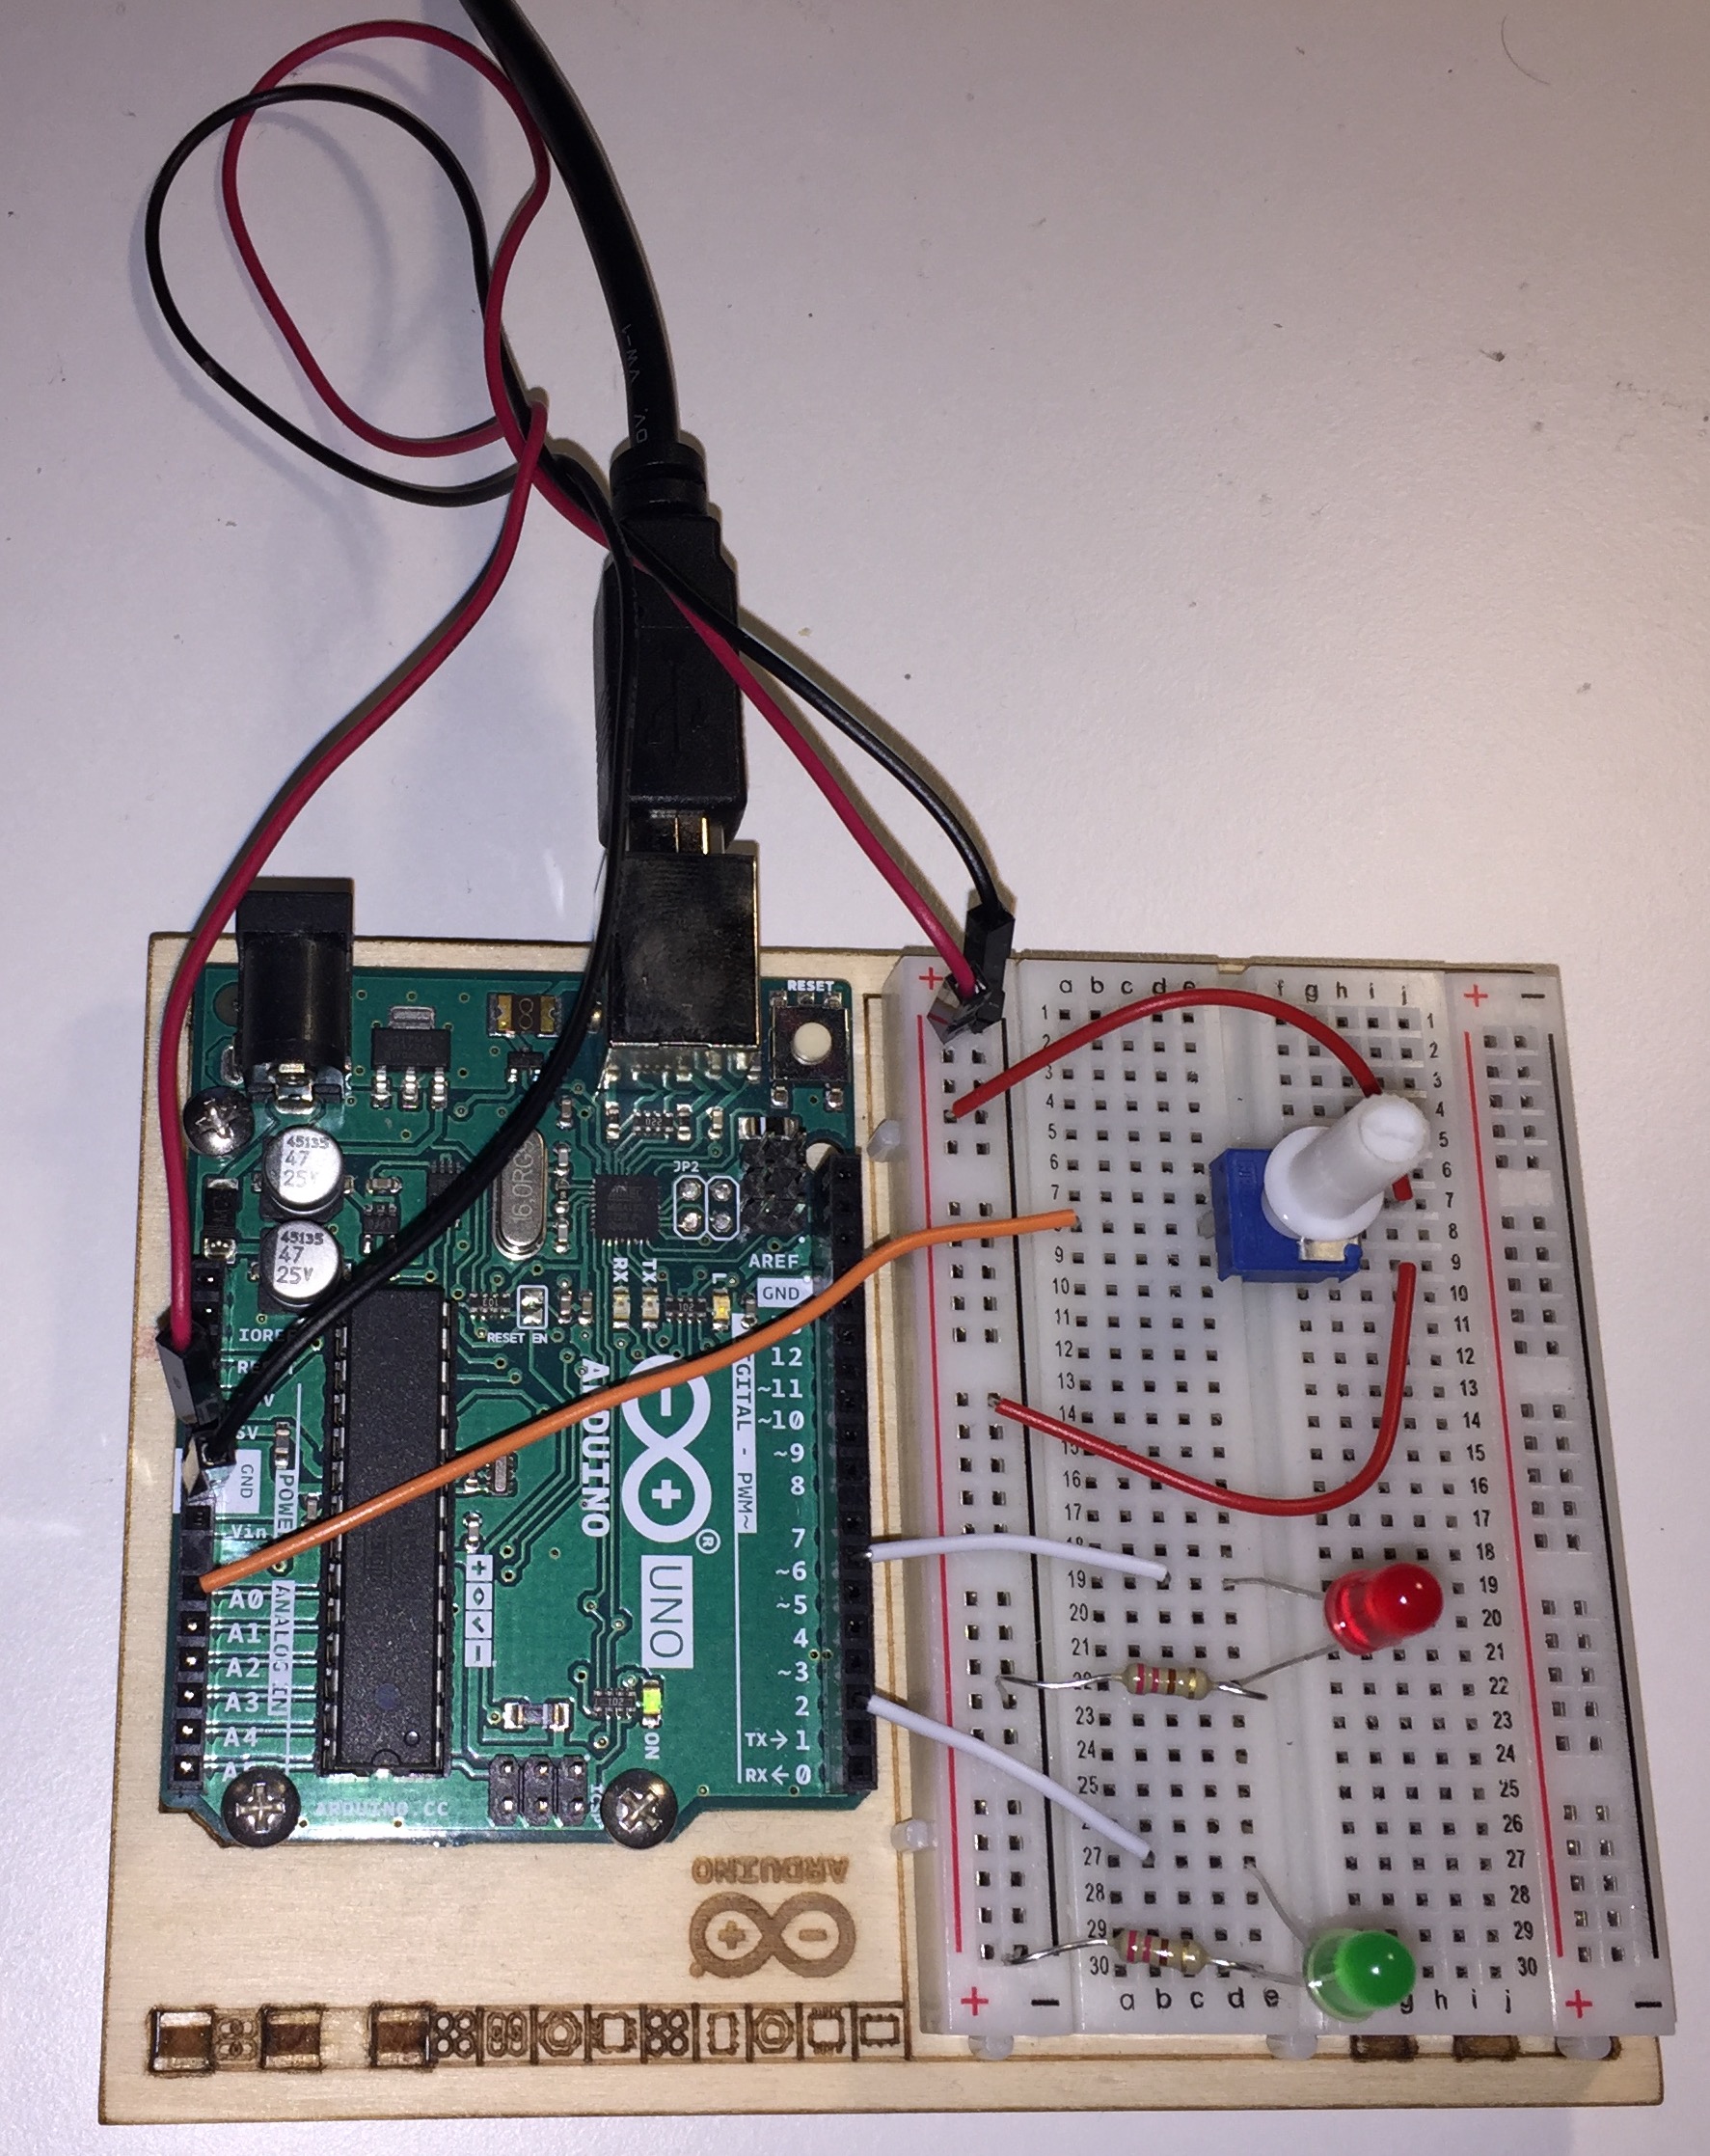
At the top of the image is the USB port, which is connected to my computer. The long red jump wire is connected to the 5V power and the long black jump wire is connected to ground. At the top of the board is a potentiometer (the blue square with the white knob), which is a knob that when turned will alter the resistance. The potentiometer is connected via the orange jump wire to analog port A0. We want to read the voltages out of this port.
At the bottom of the image are two LEDs, one green and one red. There are connected with the 220 Ω resistors to digital ports 2 and 6, respectively. We will turn the LEDs on and off by sending signals to Arduino to do so.
The Arduino board is loaded with compiled code written in Arduino’s own language, a flavor of C. The code for this circuit is shown below. The code basically tells Arduino which pins do what, and then listens for signals coming from its serial connection. Based on what signal it gets, it will either send the measurement of voltage out the serial connection or turn the LEDs on or off.
const int voltagePin = A0;

const int redLEDPin = 6;
const int greenLEDPin = 2;

const int VOLTAGE_REQUEST = 1;
const int RED_LED_ON = 2;
const int RED_LED_OFF = 3;
const int GREEN_LED_ON = 4;
const int GREEN_LED_OFF = 5;

const int ON_REQUEST = 6;
const int STREAM = 7;
const int READ_DAQ_DELAY = 8;

String daqDelayStr;

int inByte = 0;
int daqMode = ON_REQUEST;
int daqDelay = 100;

int value;
unsigned long time_ms;


void printVoltage() {
  // read value from analog pin
  value = analogRead(voltagePin);
  time_ms = millis();

  // Write the result
  if (Serial.availableForWrite()) {
    String outstr = String(String(time_ms, DEC) + "," + String(value, DEC));
    Serial.println(outstr);
  }
}


void setup() {
  // Set LEDs to off
  pinMode(redLEDPin, OUTPUT);
  pinMode(greenLEDPin, OUTPUT);
  digitalWrite(redLEDPin, LOW);
  digitalWrite(greenLEDPin, LOW);

  // initialize serial communication
  Serial.begin(115200);

  while (!Serial) ;

}


void loop() {
  // If we're auto-transferring data
  if (daqMode == STREAM) {
    printVoltage();
    delay(daqDelay);
  }

  // Check if data has been sent to Arduino and respond accordingly
  if (Serial.available() > 0) {
    // Read in request
    inByte = Serial.read();

    // If data is requested, fetch it and write it
    if (inByte == VOLTAGE_REQUEST) printVoltage();

    // Switch daqMode
    else if (inByte == ON_REQUEST) daqMode = ON_REQUEST;
    else if (inByte == STREAM) daqMode = STREAM;

    // DAQ delay
    else if (inByte == READ_DAQ_DELAY) {
      while (Serial.available() == 0) ;
      daqDelayStr = Serial.readStringUntil('x');
      daqDelay = daqDelayStr.toInt();
    }

    // else, turn LEDs on or off
    else if (inByte == RED_LED_ON) digitalWrite(redLEDPin, HIGH);
    else if (inByte == RED_LED_OFF) digitalWrite(redLEDPin, LOW);
    else if (inByte == GREEN_LED_ON) digitalWrite(greenLEDPin, HIGH);
    else if (inByte == GREEN_LED_OFF) digitalWrite(greenLEDPin, LOW);
  }
}
According to this code, if we send integers over the serial connection to Arduino, it will behave according to the table below.
signal to Arduino |
action |
|---|---|
1 |
Send voltage from port A0 |
2 |
Turn red LED on |
3 |
Turn red LED off |
4 |
Turn green LED on |
5 |
Turn green LED off |
6 |
Toggle data acquisition mode to on request |
7 |
Toggle data acquisition mode to stream |
8 |
Alert Arduino that the next input is streaming delay |
For the rest of this lesson, we will assume you have an Arduino connected to your machine configured as in the photo above, with the above Arduino code loaded in.
For convenience, we can declare variables matching these integer codes for this notebook.
[2]:
VOLTAGE_REQUEST = 1;
RED_LED_ON = 2;
RED_LED_OFF = 3;
GREEN_LED_ON = 4;
GREEN_LED_OFF = 5;
ON_REQUEST = 6;
STREAM = 7;
READ_DAQ_DELAY = 8;
Arduino will send data back to us in one of two modes, either on demand or as a stream. For on-demand data, it waits until it gets a signal from Python asking for data and then sends the time stamp and the voltage measured at analog input A0. For streaming data, it automatically sends data with a specified delay between data points.
Finding the port
When you plug the device into your compute via a serial port, you need to find out which port it is. The names of the ports will differ based on your operating system and when you plugged it in (your OS may assign the ports different names). You can get a list of ports using the serial.tools.list_ports.comports() function.
[3]:
ports = serial.tools.list_ports.comports()

# Take a look
ports
[3]:
[<serial.tools.list_ports_common.ListPortInfo at 0x7f86877029d0>,
 <serial.tools.list_ports_common.ListPortInfo at 0x7f8687702990>]
On my machine, there are two ports open. We can look at the manufacturer of the devices attached to the ports to find Arduino.
[4]:
[port.manufacturer for port in ports]
[4]:
[None, 'Arduino (www.arduino.cc)']
Clearly, the second port is Arduino. We can get then get a string for the port associated with the device.
[5]:
ports[1].device
[5]:
'/dev/cu.usbmodem146301'
For convenience, we can write a function to find Arduino.
[6]:
def find_arduino(port=None):
    """Get the name of the port that is connected to Arduino."""
    if port is None:
        ports = serial.tools.list_ports.comports()
        for p in ports:
            if p.manufacturer is not None and "Arduino" in p.manufacturer:
                port = p.device
    return port
We’ll use it to get our device.
[7]:
port = find_arduino()
Opening a connection
To open a connection to the device, we instantiate a serial.Serial instance. When a port is first opened, there is some handshaking between the device and the computer that needs to happen. To be safe, I always close the port and reopen it to get an open port, and then wait one second using time.sleep() before I send or receive data from it. I then send and receive data packets because the first input/output from Arduino Uno board is nonsense (unique to that board, I think). I will
explain the format of what we write to Arduino (bytes([1])) in a moment.
[8]:
# Open port
arduino = serial.Serial(port, baudrate=115200, timeout=1)

# Close and reopen
arduino.close()
arduino.open()


def handshake_arduino(arduino, sleep_time=1):
    """Make sure connection is established by sending
    and receiving bytes."""
    # Chill out while everything gets set
    time.sleep(sleep_time);

    # Set a long timeout to complete handshake
    timeout = arduino.timeout
    arduino.timeout = 2

    # Send request to Arduino
    arduino.write(bytes([1]))

    # Wait for Arduino to respond
    while (arduino.in_waiting < 0):
        pass

    # Read in which Arduino sent and ignore it
    _ = arduino.read_until()

    # Reset the timeout
    arduino.timeout = timeout


handshake_arduino(arduino)
In opening up the port, I set the baudrate to be 115200, which is the fastest Arduino allows. This sets the speed which which I can send data across the serial connection. The kwarg timeout sets the maximum time in seconds to wait for serial communication.
The port is currently open, and I’m not going to anything with it now, so I am going to close it. This is very important: Make sure you close your serial connection when you are done with it.
[9]:
arduino.close()
When possible, it is good practice to instead use context management when opening a serial connection. That way, it is always guaranteed to close, even when things may go awry.
[10]:
with serial.Serial(port, baudrate=115200, timeout=1) as arduino:
    handshake_arduino(arduino)

    # And the rest of what you want to do follows....
“Hello, world,” a.k.a. turning on an LED
The “Hello, world” of electronic circuits is turning on an LED. To turn on the red LED, we need to send code 2 to the Arduino. It must be sent as bytes, machine numbers Arduino can understand. To convert an integer to bytes in Python, we use the built-in bytes() function. It accepts an iterable (like a list of tuple) of ints and converts them to bytes. So, the signal we would send for code 2 is:
[11]:
bytes([2])
[11]:
b'\x02'
Let’s open up a port to Arduino and send a signal to turn on the red LED.
[12]:
with serial.Serial(port, baudrate=115200, timeout=1) as arduino:
    handshake_arduino(arduino)

    # Turn on the red LED
    arduino.write(bytes([RED_LED_ON]))
Now that we know how to turn an LED on (and off), we can make a little disco party!
[13]:
with serial.Serial(port, baudrate=115200, timeout=1) as arduino:
    handshake_arduino(arduino)

    # Flash the LEDs
    for _ in range(40):
        arduino.write(bytes([RED_LED_ON]))
        time.sleep(0.05)
        arduino.write(bytes([GREEN_LED_ON]))
        time.sleep(0.05)
        arduino.write(bytes([RED_LED_OFF]))
        time.sleep(0.05)
        arduino.write(bytes([GREEN_LED_OFF]))
        time.sleep(0.05)
Controling with Panel widgets
While calling a function to send and retrieve data from an external device (in this case our Arduino board) is useful, it is more convenient to enable control of the device using widgets available in Panel.
To do so, we need to open the connection to the Arduino and leave it open (outside of context management). Since we will want to open and close these ports manually, including having all of the (un)pleasantries of connecting and sending and receiving the first few test packets of data, we will write a function to give us an open serial connection to the Arduino (knowing of course that we will need to close it).
[14]:
def open_arduino(port, baudrate=115200, timeout=1):
    """Open a connection with an Arduino device and
    handshake to get ready for use."""
    # Open port
    arduino = serial.Serial(port, baudrate=baudrate, timeout=timeout)

    # Close and reopen
    arduino.close()
    arduino.open()

    handshake_arduino(arduino)

    return arduino
Let’s go ahead and open the connection.
[15]:
arduino = open_arduino(port)
Widgets and callbacks
As a first step in setting up control of the device, we will make toggle buttons to turn the red and green LEDs on and off. We can make the buttons using pn.widgets.Toggle(). We use button_type="danger" to give us a red button and button_type="success" to give us a green button.
[16]:
red_LED_toggle = pn.widgets.Toggle(
    name="red LED", value=False, button_type="danger", width=100,
)
green_LED_toggle = pn.widgets.Toggle(
    name="green LED", value=False, button_type="success", width=100,
)
Before we lay out the buttons, we need to define callbacks for them. A callback is a function that is called when the state of the widget changes. When we learned about dashboarding, we let the pn.depends() decorator automatically set up the links between the widgets and plots with appropriate callbacks. Now, we need to explicitly set up the callbacks.
A callback takes as an argument a Panel Event object, which is used to signal any kinds of changes in a widget. Event objects have the following attributes.
name: The name of the parameter that has changednew: The new value of the parameterold: The old value of the parameter before the event was triggeredtype: The type of event (‘triggered’, ‘changed’, or ‘set’)what: Describes what about the parameter changed (usually the value but other parameter attributes can also change)obj: The Parameterized instance that holds the parametercls: The Parameterized class that holds the parameter
For making a callback to toggle between on and off for the LEDs, we need to evaluate the new attribute and send the appropriate signal to the Arduino.
[17]:
def toggle_red_LED(event):
    if event.new:
        arduino.write(bytes([RED_LED_ON]))
    else:
        arduino.write(bytes([RED_LED_OFF]))


def toggle_green_LED(event):
    if event.new:
        arduino.write(bytes([GREEN_LED_ON]))
    else:
        arduino.write(bytes([GREEN_LED_OFF]))
Now that we have the callbacks, we need to set up watchers so that the value of the respective toggles are “watched” and the callback is called when they change. The arguments to the widget.param.watch() method (where “widget” is the name of whatever widget you are trying to watch) are the callback function and the name or names of attributes associated with the toggle (almost always 'value') whose change is to be watched.
[18]:
red_LED_watcher = red_LED_toggle.param.watch(toggle_red_LED, 'value')
green_LED_watcher = green_LED_toggle.param.watch(toggle_green_LED, 'value')
The toggles are now properly watched, so we can now lay them out and put them to use.
[19]:
pn.Row(red_LED_toggle, pn.Spacer(width=15), green_LED_toggle)
Data type cannot be displayed:
[19]:
The LEDs on the Arduino can then be toggled using those two buttons.
Since we will shift gears and start retrieving data from Arduino, we will close the connection and reopen it as we need it.
[20]:
arduino.close()
Retrieving data from Arduino
So far, we have used our serial connection to toggle LEDs on and off, but ultimately, we would like to receive data from the device. To do this, we can send data requests and then read what comes back.
Based on the above Arduino code, when we are in ON_REQUEST mode, Ardunio waits for a request for data to come through its serial connection to the computer. Upon receipt of a request, it sends data back. The time and voltage data come in as a byte string (Python data type bytes) containing the time and voltage separated by a comma. The byte string ends with both a carriage return (\r) and a newline (\n). To convert the byte
string to numbers, we need to strip the carriage return and newline and decode the byte string into the Python strings we are used to using the decode() method. Finally, we can split the resulting string at the comma to get the voltage and time point for each.
Arduino values from analog inputs are 10 bit unsigned integers, with values ranging from 0 to 1023. So, when the voltage is written out, it will be an integer, which we need to convert to a voltage, knowing that the voltage on the Arduino Uno goes from zero to five volts. The time stamps are in milliseconds, transmitted as 32-bit unsigned integers. So, we should convert the voltage number we receive to Volts. The function below parses a byte string sent from Arduino.
[21]:
def parse_raw_line(raw_line):
    """Parse bytes output from Arduino."""
    raw_line = raw_line.decode()
    if raw_line[-1] != "\n":
        raise ValueError(
            "Input must end with newline, otherwise message is incomplete."
        )

    t, V = raw_line.rstrip().split(",")

    return int(t), int(V) * 5 / 1023
We can make a button that requests data from Arduino when pressed. We will link it to a function that sends a request and gets data, appending the results to lists. First, we’ll set up the lists and the data acquisition function. It must take a single argument (which we will ignore) to have the correct call signature to be used when linked to a Panel button.
[22]:
time_ms = []
voltage = []

def daq_request_single(event=None):
    """Ask Arduino for a single data point"""
    # Ask Arduino for data
    arduino.write(bytes([VOLTAGE_REQUEST]))

    # Wait for data to arrive
    while arduino.in_waiting < 0:
        pass

    # Read in the data
    raw = arduino.read_until()

    # Parse and add data set
    try:
        t, V = parse_raw_line(raw)
        time_ms.append(t)
        voltage.append(V)
    except:
        pass
Note that we attempt to parse the input in a try block in case the message is corrupted, incomplete, or otherwise unparsable. Now we can make the button and link it to the request function using the on_click() method.
[23]:
daq_button = pn.widgets.Button(name="GET DATA", button_type="primary")

daq_button.on_click(daq_request_single)
Now we display open up a connection to Arduino and display our button to get data back.
[24]:
arduino = open_arduino(port)

daq_button
Data type cannot be displayed:
[24]:
I clicked the button several times while adjusting the knob on the potentiometer. Let’s see what we got!
[25]:
print("time (ms)    voltage (V)")
for t, V in zip(time_ms, voltage):
    print(t, '      ', V)
time (ms)    voltage (V)
2227        3.3822091886608017
2876        2.7174975562072334
3491        1.598240469208211
4229        3.8905180840664713
4820        2.463343108504399
5573        1.2609970674486803
6206        2.1065493646138806
6887        3.455522971652004
7607        4.257086999022483
8318        3.4359726295210167
Great! We have demonstrated that we can control an external device by sending signals and can retrieve data from the device as well.
In the next lesson, we will use the same setup to build apps to continuously retrieve data from Arduino while still controlling it. This requires asynchronous computing, and therefore a bit more sophistication.
Computing environment
[26]:
%load_ext watermark
%watermark -v -p serial,panel,jupyterlab
CPython 3.7.7
IPython 7.16.1

serial 3.4
panel 0.9.7
jupyterlab 2.1.5